9.24.2013

Simple Fabric Button Earrings

Confession: I am a fabric hoarder. I love sewing and when I see fabric I like, I have to have it.  I've gotten a lot better (especially since I'm running out of space in my sewing room, yikes!) but I have so many scraps of cute fabric that I swear I'm going to do something with and I never do.  This project is the one of the BEST fabric stash busters, because you hardly need any fabric at all (great to use up the tiny, bitsy scraps that I have no business keeping but can't bear to throw out) and you get to showcase your cute fabric finds on your ears while you're out and about. ;)


These are the most fun, easy, quick little earrings that you can possibly make!  They are made just using cover buttons and your fabric scraps, and honestly take only 5 minutes. These would make perfect little birthday gifts for friends, and how fun would it be to make these in matching fabrics for every outfit!? Cover buttons come in lots of different sizes, so make sure to pick ones that would be good for earrings.
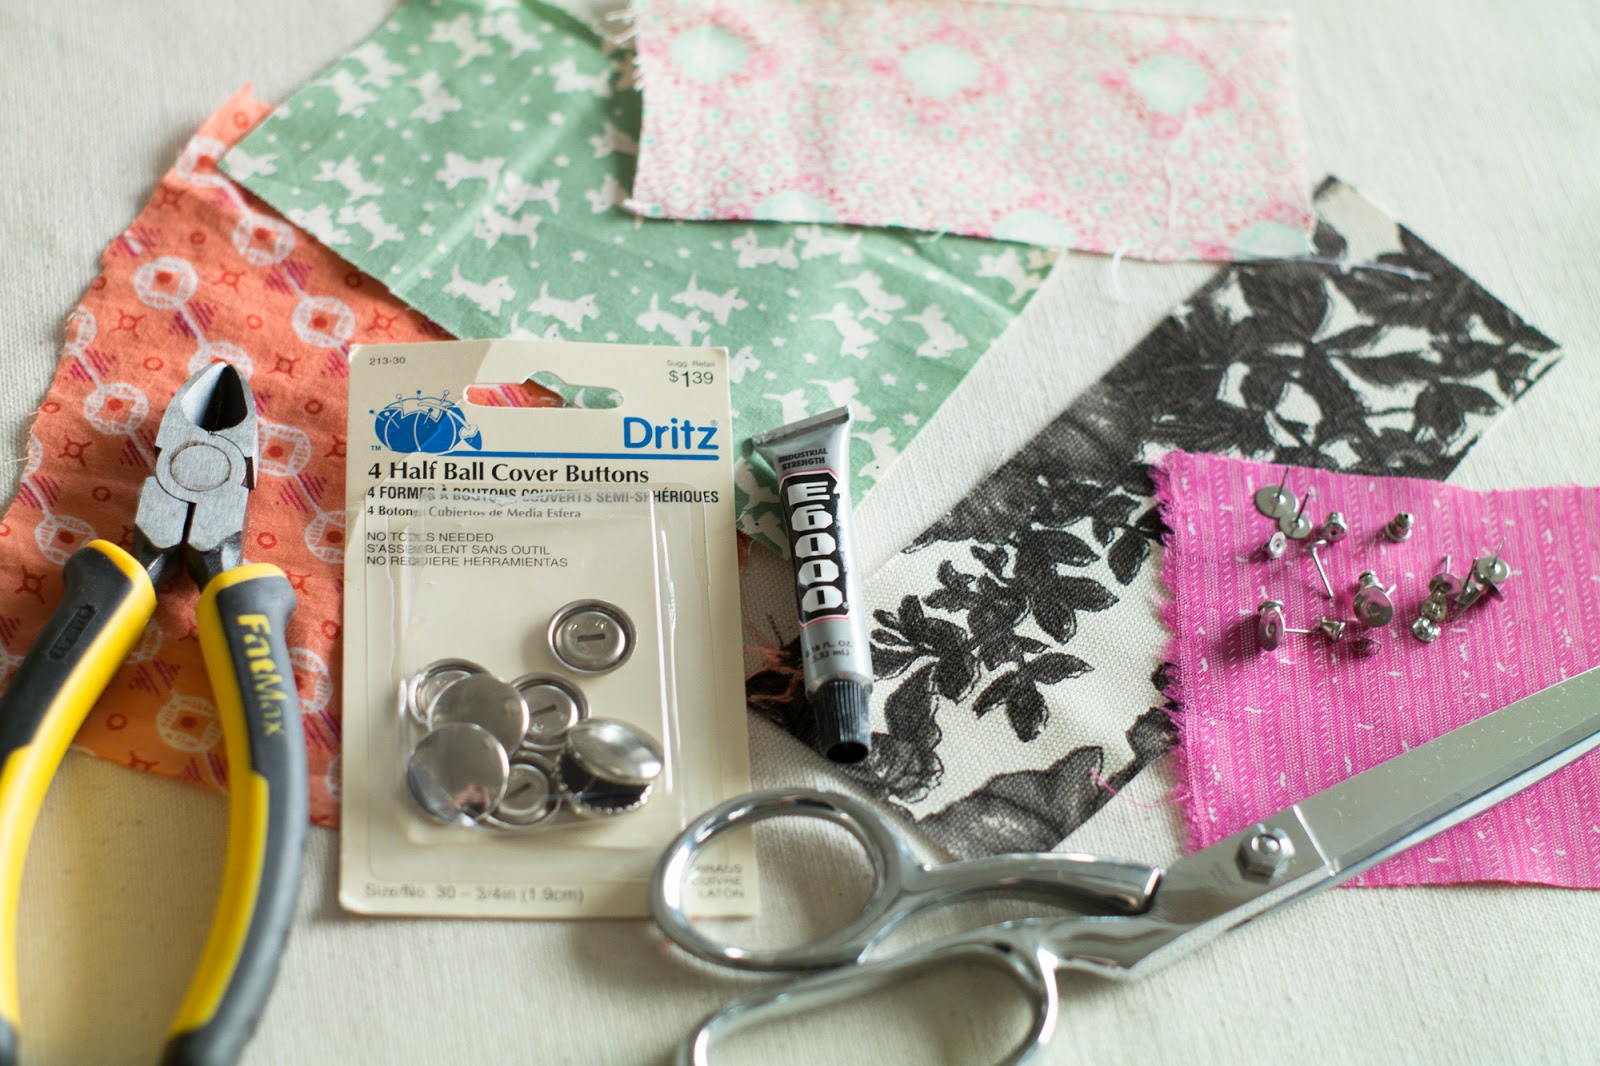

Fabric Button Earrings How-to

Supplies
  • Fabric scraps
  • Cover buttons
  • Earring backs
  • Super glue (I used E6000)
  • Pliers
  • Scissors


  1. Use the pattern on the box of buttons to cut out two circles of your fabric.
  2. Using pliers, pull out the button shank and discard it.  (The shank is the squiggly piece of wire you can see in the second photo above)
  3. Place the circle of fabric on the front of the button, and begin gathering it in toward the center of the button back--catching it on the teeth-like hooks around the edge.
  4. Continue gathering until all edges of the fabric are caught on the hooks.  Double check the front side of the button to make sure there aren't any folds or puckers as you go.
  5. Snap the back of the button on, which will secure the fabric in place.
  6. Use super glue to attach an earring back to the middle back of the button.  Let dry.


These earrings are so fun and so quick, I want to make them to match every outfit!

Happy Tuesday everyone!

9.16.2013

Fall Activities

Okay it's been raining all weekend and I can totally feel it in the air: Fall is coming! Fall is definitely my favorite season.  I love the crisp air, vibrant colors, cozy afternoons, and the smell of spices in the air.  Luke and I started a little tradition where at the beginning of a season we make a few "goals" or activities that we want to do in the coming months.

For summer, it was:
  1. Go camping 2 times  -  Overachievers, we went 3 times! Twice in the Uintas, once with our friends in Logan Canyon.
  2. Go swimming a lot!  -  Done and done! My mom's neighborhood has a community pool overlooking the lake. LOVE.
  3. Take a mini vacation  -  We went to Moab with Luke's family in the May, so that counts! Also, camping vacations.
  4. Go fishing and catch something  -  Luke caught a fish at Butterfly Lake in the Uintas!
  5. Go on a few hikes  -  Kind of.  We did some hiking in Moab and a fun hike with Camille and DJ in Logan Canyon, but we might try to get a few more hikes in before it snows.
  6. Finish getting our yard ready for planting next year.  -  Uhhh, not so much.  We decided to take a little break from shelling out $$$ on this yard.  At least this year we got sprinklers and grass, the rest will have to wait until Spring.
Here are my Fall "Goals":


I'm especially excited for the moonlight ski lift ride at Sundance and Oktoberfest.  I've never been to Oktoberfest before, have you guys? It seems so fun and I'm obsessed with German food so I'm sure it'll be a blast.


What do you want to accomplish or do for fun this Fall?

9.12.2013

End of Summer Yogurt Pops

Okay I'm a sorry excuse for a blogger, I'm sorry I've been MIA forever! I had the craziest craziest week last week so I've just been playing catch-up for the last few days. I had lots of fun stuff going on though, making a pattern and consequently a gown for the lovely lady in the pic below (Beccy and her husband are making a documentary about living on Bitcoin, check it out here: http://lifeonbitcoin.com/ and yes, she did pay me in Bitcoin!) Also my sister-in-law, Lauren, gave me a bunch of peaches and OH MY GOSH, I have never liked peaches in my life until now.  I think I ate 5 in one day, oops!  My husband and I put in some pavers in our yard on Labor day, I made some yummy homemade Ritz Crackers, and we went to see Blue Jasmine (lovely!) and took a crappy phone pic in the theater.  A successful week!


Something else I did in the lifetime I was away from the blog was make these yummy raspberry yogurt pops! I am not ready to let summer go yet--even though it's raining in Utah, I'm eating popsicles.  These are the easiest popsicles, just yogurt and fruit, so use what's ripe right now, or get a cheap bag of frozen raspberries at Trader Joes.


I would feel ridiculous writing out a full recipe for these babies, because they are way too simple.  Just mix some fruit with yogurt (or buy fruit yogurt) and layer plain yogurt, fruit chunks, and the fruit/yogurt mixture in popsicle molds and freeze. Easy easy! Martha Stewart adds sugar to hers--mine were a little more tart but I didn't want to add anything.  If you want creamier popsicles, use full fat or greek yogurt.


Make your own popsicles before it gets too cold outside.  There are zillions of popsicle recipes online to choose from.  Here are a couple that caught my eye:

Has anybody else made popsicles this summer?

8.28.2013

Homemade Jewelry Cleaner

Hi there friends! Is everyone having a good Wednesday? All of my American friends out there are halfway through the week to a 3 day weekend with Labor Day coming up.  I'm so excited! I feel like I need to plan a party or something to celebrate the last days of summer--I can't believe it's already almost fall!

I wanted to let everyone know that if you've been wanting a polka dot printed pillow, now's the time to get them while they are only $18.99 on A Painted Nest deal site!

And in other awesome news, Fifth and Mae US state necklaces are only $9.99 on Brickyard Buffalo for the next couple of days! I am obsessed with mine.

I've got something a little different for you guys today: Easy Homemade Jewelry Cleaner! I love love love this stuff because it's super cheap, uses ingredients that everyone already has, takes only 10 minutes, and it works wonders! Just check out how sparkly some of my jewelry came out below! (Don't judge me on how nasty the before photo is. ;))

This is an iphone photo I took when I used the solution a couple of months back.  Look how sparkly the diamond was after I used the cleaner! You'll be so surprised at how dirty your jewelry was and you didn't even realize it!

Homemade Jewelry Cleaner
Recipe originally from Food.com

Important Note: The source says this solution is good for "gold-filled, brass, german (nickel) silver, and sterling silver". Please check out the reviews here to read about how it worked for different materials. Be aware that it will remove any patina (blackened areas) on a piece--only use this for jewelry you want to be super shiny!

Ingredients
  • 1 piece aluminum foil
  • 1 tablespoon salt
  • 1 tablespoon baking soda
  • 1 tablespoon dish soap or dish detergent
  • 1 cup hot water


  1. Cover the bottom of a small bowl with the aluminum foil.
  2. Put the salt, baking soda, and dish soap/detergent into the bowl.
  3. Add hot water (I just use the hottest water that comes out of my tap).  Mix with a fork so that everything is incorporated.  You will probably still have grains of salt at the bottom, this is fine.
  4. Add your piece of jewelry.  Let sit for 5 to 10 minutes in the solution.
  5. Pull out your piece of jewelry and rinse in clean water.  At this point, I also use an old toothbrush to clean out any crevices on my piece. 
  6. Dry off and polish your jewelry with a soft cloth.  So clean and sparkly!
So I didn't get the best photos of my ring before/after, but hopefully you can see a bit of a difference.  When you do your own jewelry in person, you'll be amazed!


My other jewelry had an amazing transformation! It was all tarnished and dirty since I haven't worn most of it in a while.  Look how incredible:


And that's that! The solution is not reusable, so make a new batch each time you want to use it.

Happy cleaning!

8.26.2013

Guacamole and Giveaway Winner!

It's Monday and that means today we have a winner to the 100 Followers Giveaway!

Tina Dykstra, you are the winner! I'll be emailing you with details on how to claim your prizes!

Thanks everyone for entering! If you didn't win, don't be sad--follow me on Facebook and Instagram for more giveaways in the future.

Today I have a delish snack recipe for you guys. I made some Guacamole yesterday for me and my husband to have a treat while we watched Breaking Bad (ahhhh! anybody see last night's episode!?) and I am gonna brag and say this recipe is the best Guac I've ever had. Plus it is super super easy--chop up a bunch of veggies and mash them together... done!  This would make a great dip for a Labor Day party this weekend!


Guacamole is more of an art than an exact science, but this is a great base recipe.  Feel free to add your favorite ingredients to taste--jalapeƱos, tomatoes, hot sauce, anything!


Guacamole

Ingredients
  • 2 large avocados (they should be ripe and give when you press on the skin)
  • Juice from 1 lime
  • 2 tablespoons finely chopped cilantro
  • 1/4 cup green onions chopped (about 2 green onions)
  • 1 garlic clove, minced
  • 1/2 teaspoon salt
  • Dash of pepper
  • Optional: a few dashes of hot sauce


  1. Chop up your cilantro and green onions.  Pit and peel your avocado and put in a bowl. Use a fork or potato masher to mash up the avocado.
  2. Add lime juice and mix.
  3. Add the cilantro, green onions, garlic, salt, and a dash of black pepper.  Also at this point, add any extra ingredients or hot sauce.  Mix to incorporate.
  4. Taste to check for seasonings--add more salt or lime juice if needed. 
To store: I've read that you could add an avocado pit to the guacamole when storing to prevent it from turning brown--I tried it this time, and it totally works!  Store the guac in a bowl with an avocado pit in the middle (optional) and cover it in plastic wrap.  Refrigerate.


8.23.2013

If you want something you've never had...

Hi Friends! Sorry I have been sort of MIA for a couple of days... I've just had a bunch going on and I feel like I'm having some sort of crazy quarter-life crisis.  I am working on getting a new part time job and changing a few things in my life and I just feel so overwhelmed and doomsday for some reason.  I think it is just because things always turn out differently than you imagine when you're planning out your life--I thought I'd have more of a secure career and have everything figured out by now but that is definitely not the case.  But I'm sure I can figure all of this out, I'm a smart, independent adult, right?


Oh I'm such a mess.  Does anyone ever feel like this or am I crazy?

Anyway, I don't want this post to be all doom and gloom, I really am fine I've just been a little down.  I want to look at everything a bit more positively, so this is one of my favorite quotes and I'm trying to make it my mantra right now.  I made some printable versions for you guys if you like it too:


Here's to a great stress-free weekend for everyone! Make sure you enter the giveaway today if you haven't already--it ends TONIGHT and a winner will be announced on Monday!

8.20.2013

Blueberry Scones

Hello to my new followers and thanks everyone for entering the giveaway! There is still time, so if you haven't, make sure to enter here: 100 Followers Giveaway!

I have something so yummy and awesome for you guys today, it is making me hungry just posting about it.  Homemade Blueberry Scones! So where I'm from in Utah, a "scone" is usually fried dough with honey butter on it (so delicious) but these are true English scones and they are an awesomely flaky, buttery, soft pastry.


In this recipe I will teach you the secret of getting really flaky delicious dough.  A lot of the time homemade pie crust or homemade biscuits are dense and flat, not like the bakery at all. After following these instructions your dough will be better than the bakery and you'll be a pro!


This recipe is adapted from the best pastry cookbook ever, Tartine.  Tartine is a bakery in San Francisco and oh my gosh it's amazing. I love this book--it's got gorgeous photos and the recipes are out of this world.  If you are serious about baking at all run to Amazon to get your copy right now!

8.16.2013

100 Followers Giveaway!

Happy Friday, friends! I want to say hello to my new friends from the button swap.  Check them out on the sidebar--yay for new fun blogs to follow!

And, you guys! I hit 100 followers since my last post, yahoo! I want to celebrate and thank you guys for following me with an awesome giveaway.  I'm giving away a $15 gift card to Fifth & Mae as well as any 2 pillow covers from my shop, Nonpareil Home.  Goodies for yourself and your cute house!  Use the Rafflecopter below to enter.  The giveaway will run until next Friday at midnight MST. Sorry, US applicants only.


a Rafflecopter giveaway


All entries will be verified when a winner is picked.


Good luck and have a great weekend loves!

8.14.2013

5 Pinterest Accounts to Follow

Hello my friends!

If you're addicted to Pinterest like I am, I have a treat for you today! 5 Beautiful Pinterest Accounts to Follow! These people are awesome curators with incredible taste.

1. Jenny Rose - Jenny's boards are so inspiring! She's got a little bit of everything, including great inspiration for graphic designers.


2. Schirin Rachel - Beautiful inspiration and breathtaking photos.  I especially love the food board--unique ideas and pretty presentation for the foodies among us.


3. Michelle Hunt - Michelle is one of the geniuses behind Twig Creative, and her pinterest boards give us a little bit of insight into her inspiration.  She's pinned great ideas for artists and mamas.


4. Twigs & Honey - Lots of their boards are directed at brides and weddings but there are amazing fashion and party ideas for everyone!


5. Michelle Barnes - Michelle is the founder of Fifth and Mae jewelry shop and blogs over at The Copper Collective.  Michelle is a mom, artist, DIY'er, and lover of pretty things and her boards are evidence of her interests and awesome taste.


Do you have any favorite Pinners lately?  Let us know in the comments and share the love!

For even more Pinterest accounts to follow, visit At Home in Love's 10 Pinterest Accounts to Follow!

Happy Wednesday!

8.12.2013

Camping and Cookies

I'm back from camping and it was awesome.  We were up in the Uinta mountains at an amazing place called Butterfly Lake.  So pretty!  My talented husband made this amazing little video of our trip:


Uintas // 2013 from luke lewis on Vimeo.


So I spent all of my time relaxing and eating treats and I probably gained 500 pounds.  So what I should really be doing is eating healthy and getting back on track counting calories... but what am I going to do? Give you guys a recipe for the best peanut butter chocolate chip cookies ever! It's a Monday, everybody deserves a treat today!


These peanut butter cookies are the best: chewy with a crisp outside, peanut-buttery, melt in your mouth perfection.  Feel free to leave out the chocolate chips and sprinkle peanuts on top for just plain peanut butter cookies.

Peanut Butter Chocolate Chip Cookies

Ingredients
  • 1/2 cup butter (softened)
  • 6 tablespoons white sugar
  • 6 tablespoons brown sugar
  • 1 egg
  • 1 teaspoon vanilla extract
  • 1 cup peanut butter (natural or regular)
  • 1/2 teaspoon baking soda
  • 1/2 teaspoon salt
  • 1 1/4 cup flour
  • 3/4 cup chocolate chips


  1. Preheat your oven to 375 F.
  2. Cream together the butter, white sugar, and brown sugar in a bowl.  Add the egg and vanilla and mix until incorporated.
  3. Mix in the peanut butter.  Add in the flour, baking soda, and salt and mix until you have a uniform dough.  This dough is a lot stickier/softer than regular cookie dough, so just keep that in mind.  Mix in the chocolate chips.
  4. Drop by spoonfuls onto a greased cookie sheet and flatten slightly with a fork.  Bake for 10 minutes or until very lightly golden brown.  These cookies will smell so good, you'll be tempted to just pull them right off of the sheet and eat them right away, but let them cool for about 10 minutes or they'll be too crumbly.  Enjoy!


And as a final note, I want to swap buttons with you! If you have a blog you want to promote, let's swap buttons and help each other out! Check out my Swap/Sponsor Page to send me your button through Passionfruit Ads.