10.11.2013

DIY Costume - Mod Podge Crown

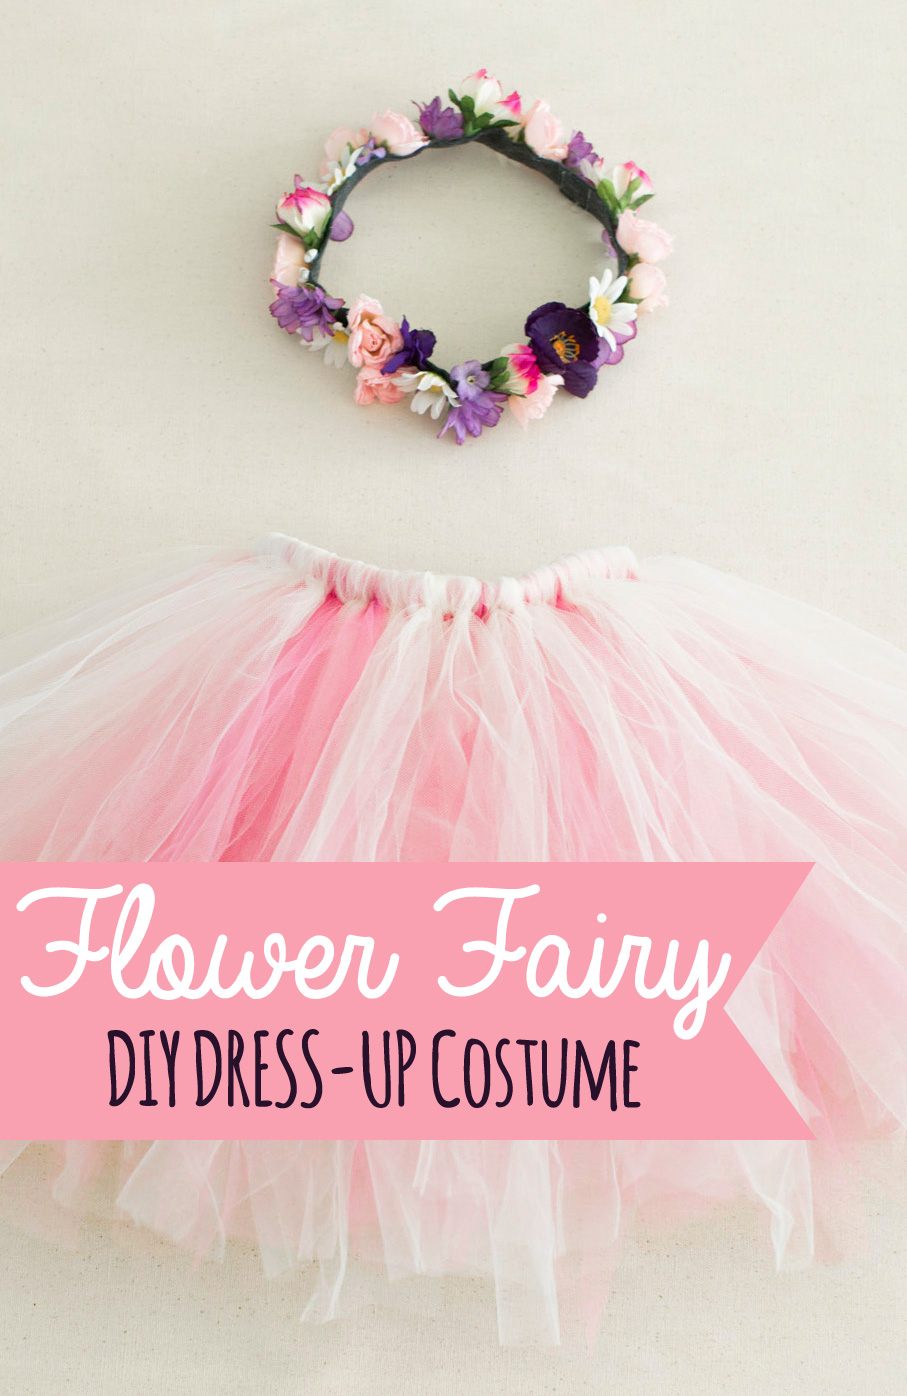
Our last day of DIY Dress-up week! Thanks everybody for reading along, I hope you have gotten a little bit of inspiration from these projects!  I've saved the easiest (and prettiest) for last.  I'm sure you've seen these lace crowns around Pinterest; usually the instructions tell you to use some sort of starch.  I was making a crown for a film and I bought a can of spray starch.  I sprayed the heck out of my lace and let it dry. Twice.  It was still limp when it dried. They say to use "fabric stiffener"--but I am much too lazy/cheap/stubborn to go buy a big jar of something that I'm only going to use once, so I tried using Mod Podge because it's what I had on hand. Voila! Nice and stiff but still flexible enough to make it a comfy crown.


Note that this crown is still flexible, if you're looking for something to stand up straight for display or make a really stiff crown, Mod Podge might not be your answer.  If you're wanting something that will actually be worn, Mod Podge is your ticket!  Also, bonus, if you don't have any Mod Podge, you can use white glue mixed with a little water.  If you don't have Mod Podge OR white glue... maybe it's time to go to the store. ;)

Mod Podge Lace Crown How-to


What you'll Need:

  • Lace trim - 2" longer than your child's head measurement.
  • Mod Podge (or white glue + water)
  • Sponge brush (optional)
  • Pot or pan with straight up and down edges
  • Waxed paper
  • Tape
  • Pins
  • Spray paint (I like Krylon metallics best)


  1. Cover your pot or pan with 2-3 layers wax paper and tape in place.  Note that your pot does not need to be the size of your child's head. The crown is wrapped around the pot just to give it a curved shape as it dries so it's easier to make into a full circle. 
  2. Coat your fabric with Mod Podge. The first few times I did this I used a sponge brush, but I've found it's a lot easier to just dunk it in the Mod Podge and get your hands really dirty.  I just saturate the whole thing with Mod Podge and then run the lace through my fingers to get rid of the excess glue (like paper mache).  In this step you'll want to take care that you aren't filling all of the lace's pretty holes with glue--that means too much Mod Podge.
  3. Wrap the lace around the pot and use pins to hold the ends in place.
  4. Let dry.  Remove the lace and test the stiffness.  You may need to add more Mod Podge at this point.  On my crown I did two coats and let dry again around the pot.  When you're happy with the stiffness, remove the crown.  You may have to peel away some of the wax paper if it stuck to the crown, that's okay!
  5. Overlap the crown 1" on each side (if you have a chance, this is a good time to test the size on your child's head) and secure.  I ran over it with a zig-zag stitch on my machine, but you could very well use glue to connect the ends.
  6. Spray paint your beautiful crown and let dry. Done!


It would be fun to add jewels and glitter to these crowns to personalize them for your kids.  They really are a cinch, it's something kids can even help to make. Have fun with it!

Now that we have finished our last dress-up costume, I wanted to share a roundup of my favorite costumes and dress-ups across the web!


  1. Bird Wings from Azulito Claro - GORGEOUS! It is in Spanish but has great how-to pics.
  2. Monster Claws from The Southern Institute - How cute and easy!
  3. Feather Headdress from The Chalkboard Mag - So pretty I want to make one for myself!
  4. Strong Man Costume from PBS - I am a sucker for funny baby costumes, what can I say?
  5. Magic Wands from Heartmade Blog - So beautiful! Would go great with the flower fairy costume.
  6. Tortise Costume from Cauliflower Kids - So cute! Not a DIY post but great inspiration.
  7. Knight Costume from Lora Jean's Magazine - This is DIY! Amazing, right?
  8. Butterfly Wings from Martha Stewart - Beautiful for kids or adults.
  9. Baby Octopus Costume from Mer Mag - My cousin sent me this link, so cute!
  10. Homemade Hats from Ikat Bag - How cool are these? Make your own hats and decorate!
  11. Moustaches and Beards from Mmmcrafts - So funny and could make a great gift!
  12. Matryoshka Doll Costume by Eileen Josephine - I've saved the absolute cutest for last. I am obsessed with this little doll costume!
Thanks for reading everybody! Have a great and crafty weekend!

10.10.2013

DIY Costume - Princess Dress

Okay so dress-up week would be a joke without at least one princess dress!  Addy is obsessed with Princesses and girly stuff (along with 90% of her fellow three-year-old girls), so this dress is a must have.  This one is already a full-on costume, for Halloween, just add tomorrow's crown and you're good to go!

And a note, this one is a real-live sewing project (not hard at all, but it is sewing!) so if you hate sewing, see ya tomorrow. ;)


There are so many ways to customize this dress, the easiest of which would be choosing amazing colors and trims.  But feel free to lengthen the sleeves, make a short ballerina-style skirt, or add extra ruffles.  Note that I used a serger in this how-to but you definitely can use a regular machine.

Princess Dress How-to


What you'll need:
  • Main fabric for your dress (I used silver/blue) - 1 1/2 yds+ depending on the size of your child. 
  • An overlay fabric for the skirt, tulle or lace (I used a cream netting) - 1 yd+ depending on the size of your child
  • A contrasting fabric for the bodice detail (I used bluish floral) - 1/8 yd (a scrap!)
  • Bodice pattern downloaded from here: http://www.burdastyle.com/patterns/child-summer-frock
  • A short length of velcro
  • 1/4" elastic
  • Various trim/buttons
  • Fabric glue (I used Fabri-tac)
  • Scissors
  • Sewing machine/supplies
Child's Measurements:
  • Waist/hips (whichever is largest)
  • Arm/bicep measurement
  • Skirt length

10.09.2013

DIY Costume - Superhero Cape and Mask

One day my niece Addy was talking to her mama and said "Mom, I need a red thing for my back." Michelle couldn't fathom what Ad was talking about, even after asking her a bunch of questions so she just let it go. Then the other day when Addy did her best superhero pose and said "I'm SUPER Adeline!" it dawned on us. A CAPE! That's the "red thing" that Ad needed for her back, haha! We should have known because she loves telling everyone that she is Super Adeline, so I'm very excited to give her this "red thing" for her back!

This is perfect for boys and girls alike.  Use it for dress-up just as-is, or dress your child in a solid color and add an easy superhero belt for a great Halloween costume! 


This costume is so easily customizable and you can make it as elaborate as you'd like.  Use a print fabric on the underside of the cape, paint stars or words on the back, add felt accents to the mask--anything!

Superhero Cape How-to


What you'll need:
  • Two different fabrics for the cape, 1/2-1 yard each depending on the size of your child
  • Elastic
  • Black and white acrylic paint
  • Textile Medium for acrylic paint
  • Paintbrushes
  • Scissors
  • Stencil plastic (this is optional, for my cape I made a circle stencil, but you could easily just freehand it.)
  • Measurements of your child's head and cape length

  1. Fold your fabric in half.  Use the cape length measurement from your child to measure how long you'd like the cape to be.  At the top, measure out from the center for how long you'd like the top of the cape to be.  Mine was 20" long and 10" wide at the top.  Mark a straight line down from the top at an angle and curve the bottom of the cape to meet this line (see above).  Cut out from both fabrics.
  2. If using a stencil: cut out a circle from stencil plastic using scissors.  Tape it down and cover the area around the stencil with paper towels (seriously do this, when I first tried this little drops of paint got all over the fabric from my painting!).  Mix fabric medium with white paint and use a stencil brush (holding it straight up and down) to fill the stencil area. Let dry.  If freehanding: Sketch out the painted area with a pencil.  Mix fabric medium with white paint and use a paintbrush to paint the area. Let dry.
  3. When dry, sketch out your letter on the white background using a pencil.  Mix fabric medium with black paint and paint your letter. Let dry.
  4. When completely dry, sew the front and back of your cape together, right sides together.  Leave the top open--just sew the right, left, and bottom seams.  Turn right side out and iron.  Fold the top raw edges in about 1/4-1/2" and press.  Then use the tutorial below on how to create a covered elastic strap.  (If you just would like to use raw elastic, measure the top edge of your cape and subtract it from your child's head measurement--this will be the length of your elastic.  For example, Ad's head measurement was 19 1/2" and the top of my cape was 10", I would make my elastic 10" or 11" to account for a 1/4" seam allowance on each end)
  5. Sandwich the raw edges of the elastic in the top seam and pin.
  6. Topstitch over the seam to secure. Done!

Covered Elastic Band

  1. Measure the top edge of your cape and subtract it from your child's head measurement--this will be the length of your elastic.  For example, Ad's head measurement was 19 1/2" and the top of my cape was 10", I would make my elastic 10" to account for a 1/4" seam allowance on each end.  Its always better to err on the side of too-long in this situation, so don't worry too much.  Cut a length of fabric 2" longer than your elastic and double the width plus a seam allowance.
  2. Fold the fabric in half and sew a seam.  Turn rightside out.
  3. Use a safety pin to feed your elastic through the fabric tube.  Pin the elastic ends so they are flush with the ends of the fabric.  You'll notice the fabric bunches a bit but when you stretch the elastic it smooths out.
  4. Stitch the ends catching the elastic in the seam.


Superhero Mask How-to


What you'll need:


  1. Cut out two mask pieces out of felt using a pattern from the site above.  
  2. Measure your mask and subtract this measurement from your child's head measurement.  This will be the length of your elastic.  For example, my mask was about 7" across, and Ad's head measurement was 19 1/2", so my elastic was 12 1/2".  If you'd like to cover your elastic, do so using the tutorial above.
  3. Sandwich the ends of the elastic between the mask pieces on either side. Pin.
  4. Topstitch (stitch about 1/8" from the edge) around the entire mask, catching the elastic in the seam.  Top stitch around the eye holes as well.


Fun fun fun! Now your little ones are ready to save the world! 

Stay tuned for tomorrow's costume!

10.08.2013

What Does the Fox Say? Fox Mask and Tail Tutorial

Today we are lucky enough to have a guest post by my amazing sister-in-law, Lauren! She has a blog and an amazing etsy shop, where she sells handmade baby shoes, clothing, and kids toys.  No idea how she gets everything done that she does, including this adorable tutorial for a Fox Costume.  Easy on and off for dress up, or just dress your little one in all brown (or orange!) with this costume for a perfect Halloween get-up!  Now on to the post!

-------

Hi there!

I'm Lauren from Cowboy and City Girl. I'm super excited to be part of this great mini series, and hope you'll forgive me if my pictures and  instructions are a bit sub-par...this is the first time I've done a tutorial! So hang on for the ride, and hopefully you can figure out what I'm trying to say. :)

With all the super cute girlie dress-ups out there, I really wanted to make something that a boy (or girl) could enjoy, and although my little Champ likes to dress up as super-heroes and cartoon characters as much as the next boy, he and his sister also love to pretend that they are different animals. So for this tutorial I thought I'd share our family's fox dress up. We (or should I say, "I") especially love this dress up because the littles can get it on all by themselves. There are no strings to tie, or Velcro to close.

 photo IMG_2776_zpsca30311c.jpg

Fox Tail and Mask How-to

I really liked the look of this reddish brown felt that I had, but my 5 year old was quick to let me know that foxes are ORANGE AND WHITE, not brown and cream. You can choose either color combination, and it would look adorable. In the instructions I'll use brown and cream.

Materials:

  • Printed Pattern. Fox mask. Fox Tail.
  • 1/4 yard orange/brown felt (or 3 sheets)
  • 1/4 yard of white/cream felt (or 2 sheets)
  • Scrap of black felt for the nose
  • Glue for felt (optional)
  • 13 inches of 1/4 elastic
  • Enough 1 inch elastic to go around your child's waist
  • Plastic grocery sacks, garbage bags, news paper or batting for stuffing tail
  • Sewing machine and other sewing supplies

Instructions:

1.  Click on links above to print out pattern pieces.

Printing Instructions/Tips:
- Click on the links above, save the images to your own computer.
- Open the files in your computer and click Print.
- Make sure that you do not scale the images at all.  On a Mac: click "Fill Entire Paper", on Windows: look in the settings and make sure you click "Actual size" instead of "Scale to Fit".
- To test if your patterns printed properly, measure the widest part of the fox tail pattern, it should be 6 1/2"

Cut out all pattern pieces as stated on pattern.  For the brown part of the tail cut a rectangle 6 1/2 inches wide and 10 inches long. Once you have two rectangles cut, taper one end of the brown tail piece so that it's slightly smaller at one side than the other. (refer to picture below)

 photo IMG_2756_zpsfdc584ec.jpg

2.  Using your felt glue (I like to use Fabri-Tac), attach the cream pieces to one side of your mask. Be sure to keep the glue away from the edges, since you'll be sewing around the edges. You could also just pin them in place, and sew around them, but I think the glue option is nice because it also adds a touch of stability. (I glued on the black nose here, but you should wait until step 5.)

 photo Sept-Dec20131-001_zps3179b1c3.jpg

3.  Topstitch (sew about 1/8" from the edge) around the cream edges of your mask.
4.  Stack brown mask pieces together, sandwiching the 1/4" elastic in between. Sew around the mask, and around the eye openings, being careful to only catch the elastic in on the two sides of the face.
5.  Glue on black nose.

(Note: It's also possible to skip almost all of the sewing, and simply glue all the pieces on, and together, but you'd need to sew the elastic on to the back of the mask in order to keep it securely attached. This could even be done by hand.)

 photo IMG_2767_zps9001cbb2.jpg

6.  Sew the cream tail piece to the wide side of the brown tail piece. Repeat with remaining pieces.
7.  With tail pieces on top of each other, sew around the outside edge, leaving the top, narrow brown section open.

 photo Sept-Dec20132-001_zps51dd7323.jpg

8.  Stuff tail with garbage bags, grocery sacks, news paper, or batting. (I used grocery sacks for mine.)
9.  Sew 1 inch elastic in a circle. (Measure your little one's waist, with clothes on, to determine how big your circle needs to be. Make it the same size as their waist, for easy on and off over clothing.)

 photo Sept-Dec20133-001_zpsdbbfde02.jpg

10.  Pin the tail to the elastic, and zig-zag stich across the top, closing the top and attaching tail to elastic.

Let your little fox run wild!

 photo Sept-Dec2013-001_zps57e480a8.jpg

10.07.2013

DIY Costume - Flower Fairy

Guys, I'm so excited for this week! All week I'll have easy and fun costume/dress-dress up DIYs for you--just in time to get ready for Halloween!  I studied costume design in school (and people always immediately think of Halloween costumes when I tell them that!) so this was super fun for me! 

I am actually making these costumes for my niece Adeline's 3rd birthday coming up in the next few weeks, she loves dress up.  A couple of things I'm trying to focus on for these costumes: 1. Easy for kids to get on and off themselves, 2. Use materials that I have readily available, 3. Pretty quick and easy to make.  All of the costumes this week are perfect for dress-ups, and you can add a little extra pizazz to use for a perfect Halloween costume.


This costume is a perfect girly-girl dress up outfit but can be made into a killer Halloween costume as well! For Halloween, just add tights/shoes, a dressy shirt and a magic wand! You can also add wings to this costume for the perfect fairy costume.  I got the idea for this costume because I have gazillions of fake flowers left over from a book I wrote and I wanted to use at least some of them up!


Flower Crown How-to

What you'll need:
  • Various fake flowers
  • A strip of felt (would be best to use green, but grey was all I had!)
  • Hot glue gun
  • Scissors

  1. First, take a measurement of your child's head.  Ad's head measurement was 19" and I wanted the final crown to be 18 1/2" around so it wouldn't slip down over her eyes.  So I cut a strip of felt 1" wide by 19 1/2" and then overlapped the two ends 1/2 inch.  To secure the crown, I sewed the ends together as in the photo above, but you could very well hot glue them down. :)
  2. Prep your flowers buy cutting the long ends off with scissors.
  3. Use hot glue to glue flowers to the felt crown.  Some flowers had longer stems that I couldn't cut off so I glued them on their sides (as shown in the photo above) and then covered this up with flowers that could lay flat.  Glue flowers around the entire crown.
  4. Check for bare spots and add in smaller flowers or random petals.  Voila!


I feel like any little girl would be in heaven with this fun crown, I want to make one for myself!


Tutu how-to
You use a bunch of tulle for this project. I didn't want to buy anything new, so I used tulle I already had.  BUT, it would have been a billion times easier/smarter to use those rolls of tulle you can buy at Hobby Lobby/Michaels.  So if you want to make it easier on yourself, use rolls of tulle.


What you'll need:

  • Tulle - regular tulle: about 6 yards (some people use up to 10 yards for giant puffy skirts!), tulle on rolls: 3-4 rolls 
  • Elastic - I used 1", but if you have a choice, I'd recommend 1/2".
  • Scissors

  1. Measure your child's waist.  Ad's measurement was 17 1/2", so I wanted the final elastic waist to be 16 1/2" or 17" to account for the elastic stretch.  So I cut my elastic to be 17 1/2" and then overlapped it 1/4" and zig zagged it closed to make a loop.
  2. Cut up your tulle.  If you are using tulle fabric like I did, cut it into strips 4-6" wide.  Next, decide how long you want your tutu to be and double that measurement.  This is how long you'll want your strips to be.  For example, I wanted my tutu to be 12" long, so my strips were 4" wide and 24" long.  *If you have rolls, you'll just need to cut strips for length.  Make it easier by using this tutorial for cutting rolls of tulle.
  3. Fold one strip of tulle in half. Fold the tulle over the elastic and pull the long ends of tulle through the loop as shown in the images above. Pull tight to secure.
  4. Continue step 3 around the elastic band using all of the strips of tulle. Be sure that you aren't stretching out the elastic as you go.  I ended up doing two layers of tulle, first pink and then another layer of white tulle.  When you're done tying, trim any scraggly ends of tulle and you're done!

This is an easy project you can finish in about an hour or two and when you're done you have a fun, bouncy, twirly skirt that your little one will love!


That's our costume for today! Visit back every day this week for more fun dress up and Halloween costume ideas!

10.05.2013

Quick and Easy Halloween Wreath

Hello my dears! I know I've been terrible at blogging but I have a bunch of fun projects lined up for you guys the next couple of weeks for fall, so forgive me! I've been falling behind with blogging a bit because I got a job! Hurray! It's just a part-time seamstress position but it is perfect for me and I'm so happy.  Thanks for all those who gave me job leads and suggestions, it helped a bunch. :)

Today I have a super simple project--an easy Halloween wreath! I love making wreaths but who has time for all of those intricate things you see on pinterest? Also I'm not too into super cutesy or overly scary Halloween decor, so I think this wreath lands somewhere in the middle.  Cute but modern and classy and will look adorable with any type of decor.


I made this wreath last year and I'm still in love with it.  However, since I made it last year I don't have awesome step-by-step photos for you all, but thankfully for us it is super super easy and you don't really need how-to photos.  You could make a cute version of this wreath with different colors--orange ribbon or a black, orange, or purple base fabric. Also, this wreath can be used as a base for tons of different Halloween designs: hang a pumpkin cut out in the middle of the wreath, add a little holiday banner or black cat--anything! Have fun with it!


Easy Halloween Wreath

What you'll need:

  • A styrofoam wreath form
  • A long strip of fabric (I've used white) or thick ribbon
  • Thin ribbon for wrapping (I've used black)
  • Ribbon for hanging the wreath (I've used black and rust orange)
  • Hot glue gun
  • Scissors
  1. Use hot glue to secure the end of your base fabric to the back of the wreath and begin wrapping it until it covers the entire wreath.  A couple of things I did:  Folded the fabric in half so that there weren't any raw fabric edges showing, wrapped at a strong diagonal so I didn't have to use so much fabric to cover, used hot glue to periodically secure the fabric.  When you've covered the whole wreath, glue the other end to the back of the wreath. Don't worry about making this layer look too perfect, you'll hardly see it after you add the other color.
  2. Get out your ribbon for the top layer. Use hot glue to secure the end of the ribbon to the back of the wreath. Wrap the ribbon around the wreath and periodically use dots of hot glue to secure the ribbon on the back of the wreath.  When you've covered the whole wreath, hot glue the end of the ribbon to the back of the wreath.
  3. If you'd like, add about a yard of two different ribbons to hang your wreath.  Adorable!


Okay and this next bit totally isn't a how-to project because, um, just find sticks and spray paint them black... but I just wanted to put forth this idea for lazy decorators like me.  I love how creepy this vase of sticks ended up looking and it took like 10 minutes to make.  Love easy projects with a big payoff!


So easy! Just make sure to let the sticks dry out before you paint them.  This is my table centerpiece right now along with some cute mini pumpkins I bought from the grocery store.  Hurray for easy decorations!


And announcement: To keep the holiday spirit going, I have a mini series coming up next week of DIY Halloween costumes (or dress ups) for kiddos! I'm excited to show you all so come visit next week to get inspired!

9.24.2013

Simple Fabric Button Earrings

Confession: I am a fabric hoarder. I love sewing and when I see fabric I like, I have to have it.  I've gotten a lot better (especially since I'm running out of space in my sewing room, yikes!) but I have so many scraps of cute fabric that I swear I'm going to do something with and I never do.  This project is the one of the BEST fabric stash busters, because you hardly need any fabric at all (great to use up the tiny, bitsy scraps that I have no business keeping but can't bear to throw out) and you get to showcase your cute fabric finds on your ears while you're out and about. ;)


These are the most fun, easy, quick little earrings that you can possibly make!  They are made just using cover buttons and your fabric scraps, and honestly take only 5 minutes. These would make perfect little birthday gifts for friends, and how fun would it be to make these in matching fabrics for every outfit!? Cover buttons come in lots of different sizes, so make sure to pick ones that would be good for earrings.


Fabric Button Earrings How-to

Supplies
  • Fabric scraps
  • Cover buttons
  • Earring backs
  • Super glue (I used E6000)
  • Pliers
  • Scissors


  1. Use the pattern on the box of buttons to cut out two circles of your fabric.
  2. Using pliers, pull out the button shank and discard it.  (The shank is the squiggly piece of wire you can see in the second photo above)
  3. Place the circle of fabric on the front of the button, and begin gathering it in toward the center of the button back--catching it on the teeth-like hooks around the edge.
  4. Continue gathering until all edges of the fabric are caught on the hooks.  Double check the front side of the button to make sure there aren't any folds or puckers as you go.
  5. Snap the back of the button on, which will secure the fabric in place.
  6. Use super glue to attach an earring back to the middle back of the button.  Let dry.


These earrings are so fun and so quick, I want to make them to match every outfit!

Happy Tuesday everyone!

9.16.2013

Fall Activities

Okay it's been raining all weekend and I can totally feel it in the air: Fall is coming! Fall is definitely my favorite season.  I love the crisp air, vibrant colors, cozy afternoons, and the smell of spices in the air.  Luke and I started a little tradition where at the beginning of a season we make a few "goals" or activities that we want to do in the coming months.

For summer, it was:
  1. Go camping 2 times  -  Overachievers, we went 3 times! Twice in the Uintas, once with our friends in Logan Canyon.
  2. Go swimming a lot!  -  Done and done! My mom's neighborhood has a community pool overlooking the lake. LOVE.
  3. Take a mini vacation  -  We went to Moab with Luke's family in the May, so that counts! Also, camping vacations.
  4. Go fishing and catch something  -  Luke caught a fish at Butterfly Lake in the Uintas!
  5. Go on a few hikes  -  Kind of.  We did some hiking in Moab and a fun hike with Camille and DJ in Logan Canyon, but we might try to get a few more hikes in before it snows.
  6. Finish getting our yard ready for planting next year.  -  Uhhh, not so much.  We decided to take a little break from shelling out $$$ on this yard.  At least this year we got sprinklers and grass, the rest will have to wait until Spring.
Here are my Fall "Goals":


I'm especially excited for the moonlight ski lift ride at Sundance and Oktoberfest.  I've never been to Oktoberfest before, have you guys? It seems so fun and I'm obsessed with German food so I'm sure it'll be a blast.


What do you want to accomplish or do for fun this Fall?

9.12.2013

End of Summer Yogurt Pops

Okay I'm a sorry excuse for a blogger, I'm sorry I've been MIA forever! I had the craziest craziest week last week so I've just been playing catch-up for the last few days. I had lots of fun stuff going on though, making a pattern and consequently a gown for the lovely lady in the pic below (Beccy and her husband are making a documentary about living on Bitcoin, check it out here: http://lifeonbitcoin.com/ and yes, she did pay me in Bitcoin!) Also my sister-in-law, Lauren, gave me a bunch of peaches and OH MY GOSH, I have never liked peaches in my life until now.  I think I ate 5 in one day, oops!  My husband and I put in some pavers in our yard on Labor day, I made some yummy homemade Ritz Crackers, and we went to see Blue Jasmine (lovely!) and took a crappy phone pic in the theater.  A successful week!


Something else I did in the lifetime I was away from the blog was make these yummy raspberry yogurt pops! I am not ready to let summer go yet--even though it's raining in Utah, I'm eating popsicles.  These are the easiest popsicles, just yogurt and fruit, so use what's ripe right now, or get a cheap bag of frozen raspberries at Trader Joes.


I would feel ridiculous writing out a full recipe for these babies, because they are way too simple.  Just mix some fruit with yogurt (or buy fruit yogurt) and layer plain yogurt, fruit chunks, and the fruit/yogurt mixture in popsicle molds and freeze. Easy easy! Martha Stewart adds sugar to hers--mine were a little more tart but I didn't want to add anything.  If you want creamier popsicles, use full fat or greek yogurt.


Make your own popsicles before it gets too cold outside.  There are zillions of popsicle recipes online to choose from.  Here are a couple that caught my eye:

Has anybody else made popsicles this summer?

8.28.2013

Homemade Jewelry Cleaner

Hi there friends! Is everyone having a good Wednesday? All of my American friends out there are halfway through the week to a 3 day weekend with Labor Day coming up.  I'm so excited! I feel like I need to plan a party or something to celebrate the last days of summer--I can't believe it's already almost fall!

I wanted to let everyone know that if you've been wanting a polka dot printed pillow, now's the time to get them while they are only $18.99 on A Painted Nest deal site!

And in other awesome news, Fifth and Mae US state necklaces are only $9.99 on Brickyard Buffalo for the next couple of days! I am obsessed with mine.

I've got something a little different for you guys today: Easy Homemade Jewelry Cleaner! I love love love this stuff because it's super cheap, uses ingredients that everyone already has, takes only 10 minutes, and it works wonders! Just check out how sparkly some of my jewelry came out below! (Don't judge me on how nasty the before photo is. ;))

This is an iphone photo I took when I used the solution a couple of months back.  Look how sparkly the diamond was after I used the cleaner! You'll be so surprised at how dirty your jewelry was and you didn't even realize it!

Homemade Jewelry Cleaner
Recipe originally from Food.com

Important Note: The source says this solution is good for "gold-filled, brass, german (nickel) silver, and sterling silver". Please check out the reviews here to read about how it worked for different materials. Be aware that it will remove any patina (blackened areas) on a piece--only use this for jewelry you want to be super shiny!

Ingredients
  • 1 piece aluminum foil
  • 1 tablespoon salt
  • 1 tablespoon baking soda
  • 1 tablespoon dish soap or dish detergent
  • 1 cup hot water


  1. Cover the bottom of a small bowl with the aluminum foil.
  2. Put the salt, baking soda, and dish soap/detergent into the bowl.
  3. Add hot water (I just use the hottest water that comes out of my tap).  Mix with a fork so that everything is incorporated.  You will probably still have grains of salt at the bottom, this is fine.
  4. Add your piece of jewelry.  Let sit for 5 to 10 minutes in the solution.
  5. Pull out your piece of jewelry and rinse in clean water.  At this point, I also use an old toothbrush to clean out any crevices on my piece. 
  6. Dry off and polish your jewelry with a soft cloth.  So clean and sparkly!
So I didn't get the best photos of my ring before/after, but hopefully you can see a bit of a difference.  When you do your own jewelry in person, you'll be amazed!


My other jewelry had an amazing transformation! It was all tarnished and dirty since I haven't worn most of it in a while.  Look how incredible:


And that's that! The solution is not reusable, so make a new batch each time you want to use it.

Happy cleaning!

8.26.2013

Guacamole and Giveaway Winner!

It's Monday and that means today we have a winner to the 100 Followers Giveaway!

Tina Dykstra, you are the winner! I'll be emailing you with details on how to claim your prizes!

Thanks everyone for entering! If you didn't win, don't be sad--follow me on Facebook and Instagram for more giveaways in the future.

Today I have a delish snack recipe for you guys. I made some Guacamole yesterday for me and my husband to have a treat while we watched Breaking Bad (ahhhh! anybody see last night's episode!?) and I am gonna brag and say this recipe is the best Guac I've ever had. Plus it is super super easy--chop up a bunch of veggies and mash them together... done!  This would make a great dip for a Labor Day party this weekend!


Guacamole is more of an art than an exact science, but this is a great base recipe.  Feel free to add your favorite ingredients to taste--jalapeƱos, tomatoes, hot sauce, anything!


Guacamole

Ingredients
  • 2 large avocados (they should be ripe and give when you press on the skin)
  • Juice from 1 lime
  • 2 tablespoons finely chopped cilantro
  • 1/4 cup green onions chopped (about 2 green onions)
  • 1 garlic clove, minced
  • 1/2 teaspoon salt
  • Dash of pepper
  • Optional: a few dashes of hot sauce


  1. Chop up your cilantro and green onions.  Pit and peel your avocado and put in a bowl. Use a fork or potato masher to mash up the avocado.
  2. Add lime juice and mix.
  3. Add the cilantro, green onions, garlic, salt, and a dash of black pepper.  Also at this point, add any extra ingredients or hot sauce.  Mix to incorporate.
  4. Taste to check for seasonings--add more salt or lime juice if needed. 
To store: I've read that you could add an avocado pit to the guacamole when storing to prevent it from turning brown--I tried it this time, and it totally works!  Store the guac in a bowl with an avocado pit in the middle (optional) and cover it in plastic wrap.  Refrigerate.