Okay so confession: the walls in my house are bare. I've lived in my house for over a year now and I have maybe like 2 pictures on the wall. It is pretty embarrassing, especially considering that I have a shop based in home decor items. One thing I did put up when I moved in, though, is this awesome cute plate wall in my kitchen. I wanted something that would work well for the large wall space that I had in my kitchen but would also be subtle and modern. One thrift shop trip later and voila! A fun plate wall that brightens up my kitchen.
This is the perfect project for the kitchen, or really anywhere else in the house. It is so versatile because you can get any color combination of plates and arrange them in any crazy arrangement you want to! I am sharing this tutorial because I learn a lot of DIY things the hard way, and for this project I tried like three different methods to hang these plates and get them straight (and I have the patched up holes in my wall to prove it!) So here is my method, I hope it works for you too!
DIY Plate Wall How-to
For this project you'll need plates, plate hangers (I got mine here at Hobby Lobby), a big piece of newspaper or tissue paper to create your plate layout on, a pencil, painter's tape, a level, nails, and a hammer.
First, wash and dry all of your plates. Follow the directions on the plate hangers to attach them to the back of your plate. On the type I bought, it said to get the back of the disc hanger wet and press it firmly onto the back of the plate. Let them dry according to the directions.
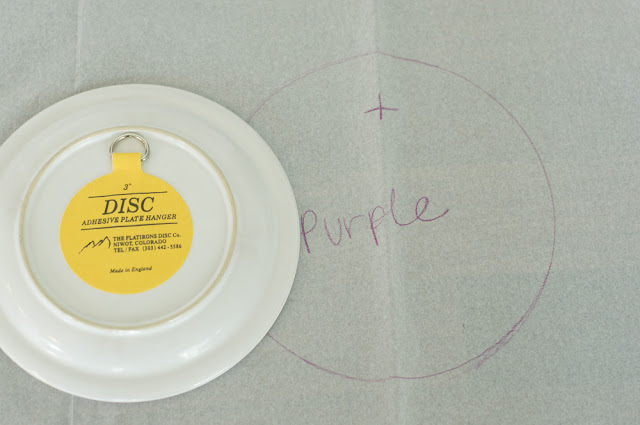
In each circle I wrote down which plate it was, just so I'd have an easier time remembering my layout when it was time to hang. Next, measure the distance from the top of the plate to the top of the plate hanger ring. Using this measurement, make a cross mark in the traced circle where the hanger ring is.
Line up the top edge of the layout paper with the level tape line from the previous step. Tape your layout paper to the wall with painters tape. Hammer nails directly through the paper into the wall using the cross marks as a guide. (You can see in this picture how I'm hammering the nail much higher than the cross mark. This is because I marked the plate hanger loop on the layout paper, so when I nail this metal hook into wall, I want the hook to be at the same level as the top of the plate hanger loop.)
When all of your nails are in the wall, remove the painters tape and rip away the layout paper. Hang up your plates and admire your hard work!


Hello Rachel! I've followed on over from your dear sister's blog :)
ReplyDeleteI love DIY projects and this one especially, I have lots of little saucers and this would be a great way to display them!
Great post :)
xx
mysmallrayofsunshine.blogspot.com
Thank you for stopping by my blog, Sarah! My sis is miles ahead of me in this blogging thing so I'm glad to have some of her friends stop by! :)
DeleteI recently came across some stunning decorative wall plates from VibeCrafts, and they completely transformed my living room wall! The designs are super unique — a perfect blend of traditional art and modern aesthetics.
ReplyDeleteThis comment has been removed by the author.
ReplyDeleteLoved this post! Decorative Wall Plates add such charm to any room. I recently explored VibeCrafts’ wall plate collection, and the handcrafted designs are vibrant, unique, and perfect for modern décor. Highly recommended if you’re looking to buy decorative wall plates online that make your walls stand out.
ReplyDeleteGreat post! Decorative Wall Plates instantly add color and personality to any room. I recently explored VibeCrafts’ wall plate collection, and their handcrafted designs are vibrant, unique, and perfect for modern home décor. If you're planning to buy decorative wall plates online, VibeCrafts has some beautiful options worth checking out.
ReplyDelete
ReplyDeleteWonderful blog on decorative wall plates! Your tips on patterns and placement are inspiring. For unique, artistic, and beautifully handcrafted wall plates that enhance interior walls with charm and elegance, VibeCrafts provides an excellent range worth exploring.